
To clean dried paint from your sprayer’s exterior and gun, start by disassembling removable parts and soaking them in the appropriate solvent for at least 30 minutes. Use brushes or tools to scrub stubborn paint, ensuring you don’t damage delicate components. Afterwards, flush the system with solvent and wipe down all surfaces. Regular cleaning prevents buildup and maintains spray quality. Keep moving forward to discover expert tips that make this process easier and more effective.
Key Takeaways
- Use a suitable solvent (water-based or oil-based) to soak and loosen dried paint on the sprayer exterior.
- Gently scrub stubborn paint deposits with brushes or specialized tools for effective removal.
- Wipe down the exterior with a solvent-soaked rag to remove residual paint and prevent buildup.
- For internal parts, flush hoses and the gun with solvent to clear any dried paint inside.
- Always wear gloves and work in well-ventilated areas when handling cleaning chemicals.

Removing dried paint from your sprayer can seem challenging, but with the right approach, you can restore it to working condition. When it comes to paint removal, acting promptly is vital. Dried paint can clog nozzles, damage internal parts, and make future sprayer maintenance more difficult. The key is to use effective cleaning methods that loosen and remove paint without harming your equipment.
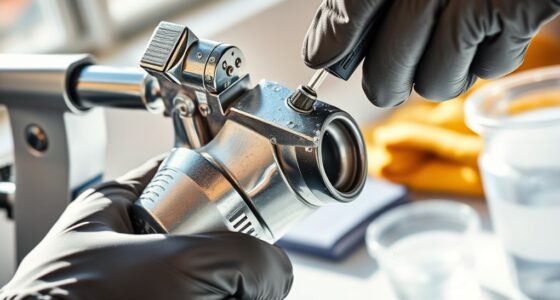
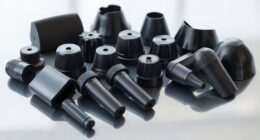
Start by disassembling your sprayer as much as possible. Remove the nozzle, wand, and any detachable parts. This allows you to access all areas where paint might be dried and hardened. For exterior cleanup, soak these parts in a solvent suited to the type of paint used—water-based paints respond well to warm, soapy water, while oil-based paints require mineral spirits or paint thinner. Submerge the parts and let them sit for at least 30 minutes, giving the solvent time to soften dried paint. For internal components, use a brush or a specialized cleaning tool to scrub away stubborn deposits gently. Be cautious not to scratch or damage sensitive parts.
If dried paint persists inside the pump or hoses, fill the container with the appropriate solvent and run the sprayer briefly to flush out the system. This helps loosen paint from within the lines, making removal easier. For stubborn clogs or thick deposits, you might need to repeat the process or use a specialized cleaning solution recommended by the sprayer manufacturer. Always follow safety instructions when handling chemicals, wearing gloves and working in a well-ventilated area.
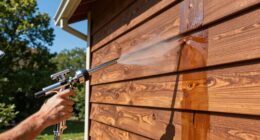
Using a proper cleaning technique can help prevent damage and prolong the life of your equipment. In terms of sprayer maintenance, regular cleaning after each project prevents paint from drying and hardening inside the equipment. For exterior surfaces, wipe down the sprayer with a rag soaked in solvent to remove lingering paint. For internal parts, thorough cleaning and proper storage extend the lifespan of your sprayer and ensure consistent spray patterns. Once all parts are cleaned and dried, reassemble your sprayer carefully, checking for any damage or wear.
Consistent paint removal and sprayer maintenance aren’t just about keeping your equipment in top shape—they save you time and money in the long run. Neglecting these steps can lead to costly repairs or replacements. The process of cleaning dried paint may take some effort, but it’s essential for reliable, efficient spraying. With patience and the right tools, you can effectively remove dried paint, maintain your sprayer, and keep it in excellent working condition for future projects.
Frequently Asked Questions
Can Dried Paint Damage My Sprayer Permanently?
Dried paint can damage your sprayer if left untreated, especially by affecting paint adhesion and causing sprayer corrosion. Over time, hardened paint may clog or corrode parts, leading to permanent damage. To prevent this, clean your sprayer promptly after use, especially if paint dries on the exterior or gun. Regular maintenance helps preserve your sprayer’s longevity, keeping it functioning smoothly and avoiding costly repairs.
Is There a Safe Way to Remove Paint Without Disassembling the Sprayer?
Yes, there’s a safe way to remove paint without disassembling your sprayer. You should start by running a compatible solvent or paint remover through the system, following the manufacturer’s instructions for paint removal and sprayer maintenance. This process helps loosen dried paint, making it easier to flush out, and reduces the risk of damage. Regularly cleaning your sprayer helps prolong its lifespan and keeps it functioning smoothly.
How Often Should I Clean My Sprayer to Prevent Paint Buildup?
Think of your sprayer as a garden tool—you wouldn’t let dirt pile up without care. To keep it working smoothly, stick to a consistent maintenance schedule. Cleaning frequency depends on your projects, but generally, clean your sprayer thoroughly after each use. This prevents paint buildup, extends its lifespan, and ensures top performance. Regular upkeep means fewer headaches and a sprayer ready when you need it most.
What Are the Best Eco-Friendly Solvents for Cleaning Dried Paint?
When choosing eco-friendly solvents, look for biodegradable cleaners that effectively break down dried paint without harming the environment. You can try options like plant-based solvents, citrus-based cleaners, or vinegar solutions. These eco-friendly solvents are safe for you and the planet, making your cleanup process more sustainable. Always test a small area first and follow the manufacturer’s instructions to guarantee safe and effective removal of dried paint from your sprayer.
Can Cleaning Dried Paint Void the Sprayer’s Warranty?
You might worry that cleaning dried paint could void your sprayer’s warranty, but that’s often a misconception. Warranty implications depend on following the manufacturer’s recommended cleaning procedures, using approved solvents, and avoiding damage. If you stick to their guidelines, cleaning your sprayer shouldn’t void the warranty. Always read the warranty terms carefully and use eco-friendly, manufacturer-approved cleaning methods to protect your investment while maintaining peak performance.
Conclusion
Cleaning dried paint off your sprayer is like unraveling a tangled mess—you just need patience and the right tools. With a little effort, you’ll have your sprayer looking and working like new, ready for your next project. Remember, regular cleanup saves time and keeps your equipment in top shape. So, don’t let dried paint be a stubborn obstacle—tackle it today and enjoy smooth, flawless finishes tomorrow.

Franz came aboard the Paint Sprayer Zone team with a background in both journalism and home renovation. His articulate writing style, combined with a passion for DIY projects, makes him an invaluable asset. Franz has a knack for breaking down technical jargon into easy-to-understand content, ensuring that even the most novice of readers can grasp the complexities of paint sprayers.