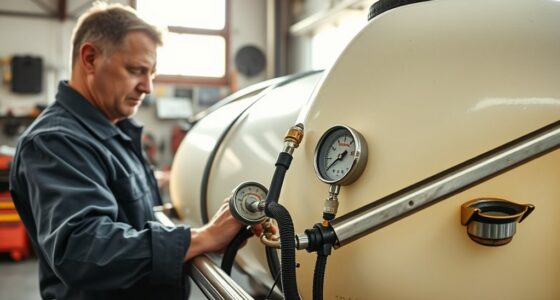
To check and change pump balls and seats, start by shutting off power and draining the pump if needed. Carefully disassemble the valve to inspect for cracks, erosion, or damage. Replace worn-out or damaged parts with manufacturer-approved materials, ensuring a proper fit. Clean all components thoroughly before reassembling, making sure the ball moves freely and seats properly. Performing these steps regularly keeps your pump running smoothly, and if you continue, you’ll discover more tips to maintain peak performance.
Key Takeaways
- Shut off power, drain the pump, and carefully disassemble to access the valve assembly before inspection.
- Examine the ball and seat for cracks, erosion, grooves, or pitting indicating damage or wear.
- Replace damaged or worn components with manufacturer-recommended parts matching original specifications.
- Clean the valve chamber thoroughly to remove dirt, debris, and old sealant before reassembling.
- After reassembly, test the pump for leaks and proper pressure to ensure the valve seals correctly.

Regularly inspecting and replacing pump balls and seats is essential to guarantee your pump operates smoothly and reliably. Maintaining your pump’s components, especially the valves, is a key part of effective pump maintenance. Over time, the pump ball and seat can wear out due to constant pressure, corrosion, or debris, leading to decreased performance or failure. By proactively checking these parts, you prevent unexpected breakdowns and extend the life of your pump.
Start your pump maintenance routine by shutting off the power and draining the pump if necessary. Once safe, carefully disassemble the pump to access the valve assembly. During inspection, look for signs of wear, such as cracks, deformation, or surface erosion on both the pump ball and the seat. If the ball appears cracked or deformed, or if the seat has deep grooves or pitting, it’s time to replace these parts. Keep in mind that even minor imperfections can cause leaks or loss of efficiency, so thorough valve inspection is crucial. Always use manufacturer-recommended replacement parts to guarantee compatibility and peak performance.
Begin by shutting off power, draining the pump, and inspecting for wear or damage on the ball and seat.
When replacing the pump ball, select a size and material that match the original specifications. Common materials include rubber or reinforced elastomers, chosen for their durability and sealing properties. The seat, which provides a sealing surface for the ball, should also be replaced if damaged. Proper seating is essential to prevent leaks and maintain pressure. Before installing the new ball and seat, clean the valve chamber thoroughly to remove dirt, debris, and old sealant residues. This step ensures a tight seal and smooth operation once reassembled. Additionally, understanding the contrast ratio in your pump’s performance can help you evaluate the effectiveness of your maintenance.
During reassembly, make sure the ball moves freely within the seat without excessive play or resistance. A loose or improperly seated ball can cause leaks, while an overly tight fit might hinder movement and increase wear. After reassembly, perform a pressure test to verify the integrity of the valve and confirm there are no leaks. Regular valve inspection during routine pump maintenance helps catch problems early, saving you money and downtime in the long run.
Consistent checks and timely replacements of pump balls and seats contribute considerably to reliable pump operation. Don’t overlook this fundamental aspect of pump maintenance, as it directly impacts efficiency and longevity. When you keep the valves in top shape, your pump will run smoother, handle pressure better, and deliver consistent performance. Remember, a well-maintained pump is a dependable pump, and proactive valve inspection is your best tool to keep everything running flawlessly.
Frequently Asked Questions
How Often Should Pump Balls and Seats Be Inspected?
You should inspect pump balls and seats during regular pump maintenance, ideally every three to six months, depending on usage. Regular inspections help guarantee peak performance and safety precautions are met. Look for signs of wear, cracks, or leaks, and replace components as needed. Staying diligent with these checks prevents failures, extends equipment life, and keeps your operation safe and efficient.
Can I Reuse Old Pump Balls and Seats?
Like a wise craftsman, you wouldn’t reuse worn tools, and that applies to pump balls and seats too. Reusing old pump balls isn’t advised because their durability diminishes over time, risking failure. When selecting seat material, consider its resilience, as inferior choices can lead to leaks. For safety and efficiency, always replace pump balls and seats when signs of wear appear, ensuring your pump remains reliable and performs at its best.
What Signs Indicate a Pump Ball or Seat Needs Replacement?
You’ll know your pump ball or seat needs replacement during pump maintenance when you notice troubleshooting signs like inconsistent pressure, leaks around the seat, or difficulty maintaining a proper seal. If the pump struggles to build or hold pressure, or if the ball feels soft or misshapen, it’s time to substitute them. Addressing these signs promptly ensures your pump functions efficiently and prevents further damage.
Are There Specific Tools Required for Checking and Changing Pump Components?
You don’t need a Swiss Army knife for pump maintenance, but having a few basic tools makes life easier. Typically, you’ll want a wrench, pliers, and possibly a screwdriver to check and change pump components. These tools help you loosen fittings, remove old pump balls or seats, and install new parts securely. With the right tools, you’ll avoid frustration and guarantee your pump runs smoothly, like clockwork.
How Do Temperature Changes Affect Pump Ball and Seat Performance?
Temperature changes can impact pump ball and seat performance by causing material expansion or contraction. When temperatures rise, materials expand, which might lead to looseness or misalignment, resulting in performance degradation. Conversely, cold temperatures cause contraction, potentially making components tighter or more brittle. Regularly monitor for these changes, as they can reduce efficiency or cause leaks, and adjust or replace parts as needed to maintain ideal pump operation.
Conclusion
Now that you know how to check and change pump balls and seats, you’ll handle your pump with confidence. With careful inspection and timely replacements, you’ll prevent problems and promote proper performance. Remember, frequent fixes foster flawless functionality, saving you time and trouble. So, stay vigilant, stay alert, and keep your pump in prime condition. Proper maintenance guarantees your pump performs perfectly, providing peace of mind and persistent productivity. Keep it up, and you’ll always stay ahead!

Franz came aboard the Paint Sprayer Zone team with a background in both journalism and home renovation. His articulate writing style, combined with a passion for DIY projects, makes him an invaluable asset. Franz has a knack for breaking down technical jargon into easy-to-understand content, ensuring that even the most novice of readers can grasp the complexities of paint sprayers.