To replace a pressure relief or prime valve, first turn off your system and relieve any pressure. Carefully loosen the old valve using a wrench, checking for damage or wear. Wrap Teflon tape around new valve threads and screw it in by hand, then tighten with a wrench without over-tightening. Once installed, gradually restore power and pressure, inspecting for leaks. If you stick with these steps, you’ll gain confidence in handling future replacements successfully.
Key Takeaways
- Turn off system power and relieve pressure before removing the old valve to ensure safety.
- Loosen and inspect the old valve, replacing worn seals or gaskets as needed.
- Wrap new valve threads with Teflon tape or sealant and carefully screw it in without over-tightening.
- Gradually restore power and pressurize the system, checking for leaks around the new valve.
- Test the valve’s proper operation and reassemble all components, ensuring system safety.
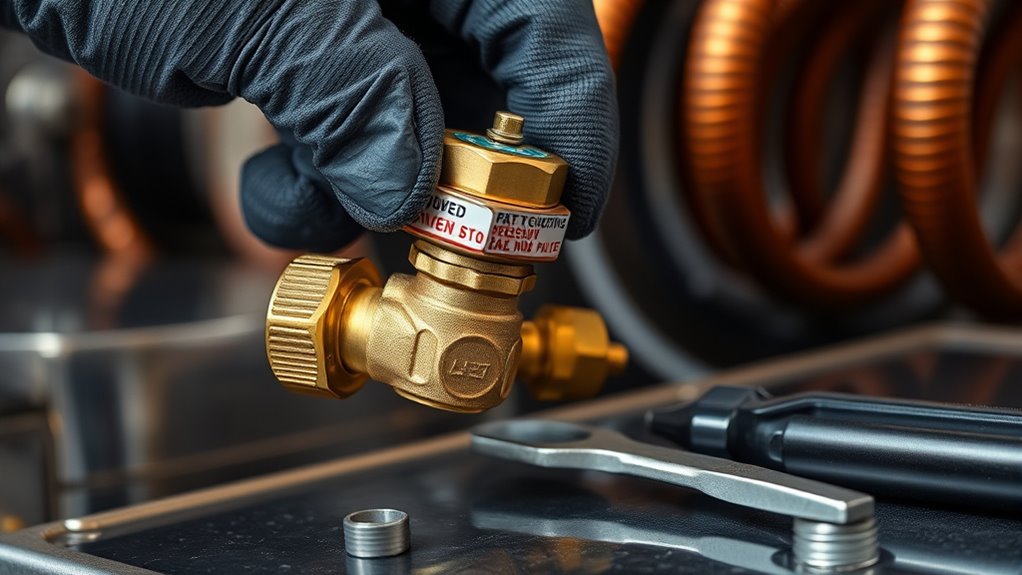
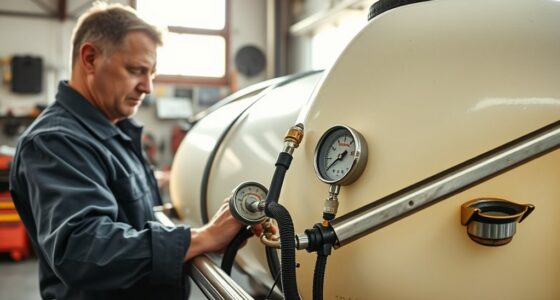
Replacing a pressure relief or prime valve is a straightforward task that guarantees your equipment operates safely and efficiently. When you decide to replace the valve, the first step is to ensure you have the correct replacement part that matches your system’s specifications. Before beginning any work, shut off the system’s power and relieve any pressure in the tank or lines. This safety step prevents accidents and makes the installation process smoother. Once the system is depressurized, locate the valve—typically near the top of the tank or along the piping—and prepare your tools, usually wrenches, screwdrivers, and possibly thread sealant or Teflon tape.
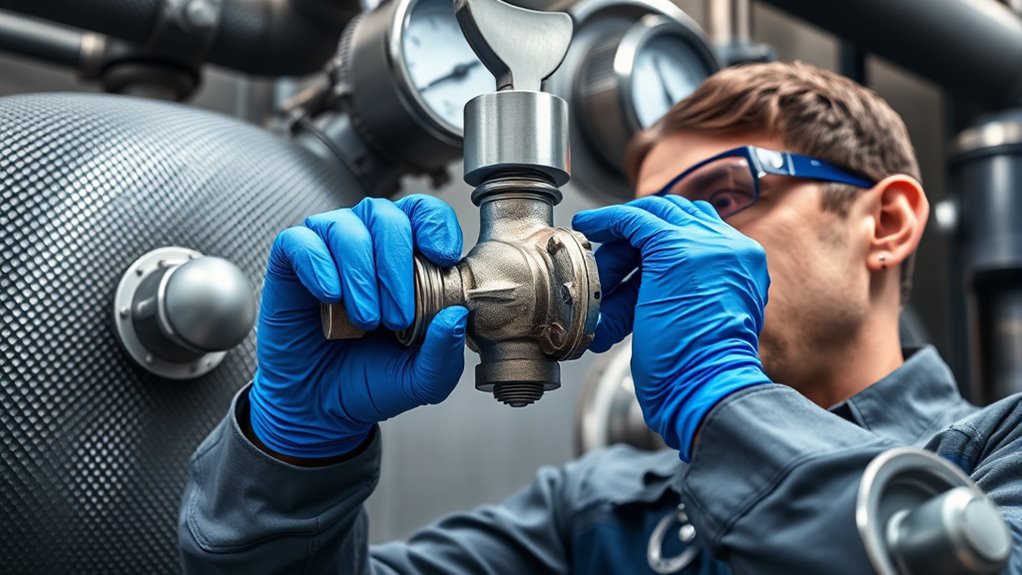
Start by removing the old valve carefully, using a wrench to loosen it without damaging the surrounding components. If the valve is stuck, applying a penetrating lubricant around the threads can help loosen it. When removing the valve, check the condition of the threads and the gasket or O-ring; replace these if they’re damaged or worn to ensure a proper seal. Next, clean the mounting surface thoroughly to eliminate rust, debris, or old sealant, which could compromise the new valve’s effectiveness. Before installing the new valve, wrap the threads with Teflon tape or apply thread sealant to prevent leaks. Be cautious not to over-tighten the new valve, as this can strip threads or crack the fitting. Hand-tighten first, then give it a slight turn with your wrench, but stop once it’s snug to avoid over-tightening.
After installation, double-check all connections for tightness, then slowly turn the system back on and pressurize it gradually. Observe the new valve for any leaks or irregularities. If you notice leaks, gently tighten the fitting further or reseal with additional thread tape. If the valve doesn’t operate correctly or leaks persist, troubleshooting tips include verifying the valve orientation, checking the pressure settings, or replacing the valve again if it’s defective. Proper installation steps and careful inspection during the process can save you time and prevent future issues. Remember, safety is paramount. If at any point you’re unsure or encounter resistance, consult the manufacturer’s guidelines or seek professional assistance. Regular maintenance, including inspecting and replacing valves when needed, is essential for equipment safety and longevity. By following these steps, you ensure your pressure relief or prime valve functions reliably, maintaining the safety and efficiency of your equipment for years to come.
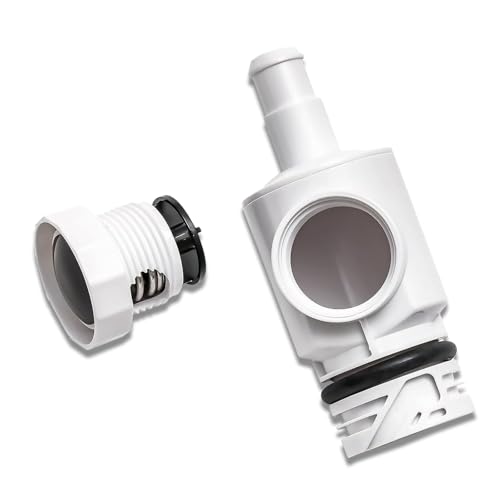
LoMoTive D29 UWF Quick Disconnect & 9-100-9002 Pressure Relief Valve Replacement Kit fit for Zodiac Polaris Pool Cleaners 180,280,380,480 PRO,3900 Sport – Leak-Proof Wall Fitting (1 Pack)
- Package Includes: D29 UWF disconnect and pressure relief valve
- Compatibility: Fits Zodiac Polaris 180/280/380/480 PRO/3900 Sport
- Pressure Protection: Prevents damage with auto-releasing excess pressure
As an affiliate, we earn on qualifying purchases.
As an affiliate, we earn on qualifying purchases.
Frequently Asked Questions
How Do I Identify a Faulty Pressure Relief/Prime Valve?
You can identify a faulty pressure relief/prime valve by checking water pressure inconsistencies and performing a thorough valve inspection. If you notice frequent pressure drops, leaks around the valve, or it doesn’t open when it should, these are signs it’s failing. During inspection, look for corrosion, debris, or damaged components. These issues indicate the valve isn’t functioning properly and needs attention to maintain system safety and efficiency.
Can I Replace the Valve Myself or Need a Professional?
You can replace the valve yourself if you’re comfortable with DIY installation and confirm valve compatibility with your system. Carefully follow manufacturer instructions, turn off water supply, and release pressure before starting. If you’re unsure or uncomfortable, it’s best to hire a professional to avoid mistakes. Proper installation guarantees safety and functionality, so don’t rush—taking your time ensures a successful replacement.
What Tools Are Necessary for Replacing the Valve?
You’ll need basic tools like a wrench, screwdriver, and possibly pliers to replace the valve. Check the valve specifications to guarantee compatibility, and consider the replacement costs before starting. Having the right tools makes the job easier and safer, especially if you’re comfortable with DIY projects. If you’re unsure or the valve is complex, hiring a professional might be worth the extra cost for proper installation.
How Long Does a Typical Valve Replacement Take?
Replacing a valve is like opening a gate to your system’s future, usually taking about 30 minutes to an hour. You’ll want to evaluate valve longevity, as a good one can last years, making the replacement worth the cost. While the process might seem quick, the actual replacement costs depend on the valve type and your system’s complexity. Be prepared for a smooth, efficient swap that keeps everything flowing seamlessly.
Are There Safety Precautions to Consider During Replacement?
Yes, you should wear safety gear like gloves and goggles to protect yourself during the replacement. Before starting, make certain you perform an electrical shutdown to prevent any risk of shock or short circuits. Follow all manufacturer instructions carefully, and double-check that the system is depressurized and powered off. Taking these precautions helps keep you safe and ensures a smooth, hassle-free valve replacement process.
Conclusion
Once you’ve replaced the pressure relief/prime valve, imagine the steady hum of your system settling into perfect harmony. Feel the gentle pulse of pressure stabilizing, like a calm heartbeat beneath your fingertips. As you tighten the final fittings, envision the flow of water flowing smoothly, free of obstructions. With everything in place, you’ve restored an essential rhythm, ensuring safety and efficiency. Now, step back and enjoy the quiet assurance of a job well done.

Franz came aboard the Paint Sprayer Zone team with a background in both journalism and home renovation. His articulate writing style, combined with a passion for DIY projects, makes him an invaluable asset. Franz has a knack for breaking down technical jargon into easy-to-understand content, ensuring that even the most novice of readers can grasp the complexities of paint sprayers.