It is essential to keep the fluid section of a Titan 440 Airless Paint Sprayer in top condition for the best performance. Regularly inspecting and replacing any worn or damaged components is key to achieving this.
The user should turn off the power switch, unplug the cord, and release pressure using the relief valve. Hoses must be disconnected correctly, and the fluid section disassembled for cleaning.
After replacing any necessary parts, the sprayer should be reassembled and tested. Throughout the process, following safety precautions is essential for personal safety.
Key Takeaways
- Proper maintenance and cleaning of the fluid section is crucial for optimal performance.
- Regularly inspect and replace worn or damaged parts to maintain optimal paint application.
- Follow safety precautions when removing the fluid section to ensure personal safety.
- Carefully reassemble the sprayer and test for proper functionality to ensure efficient operation.
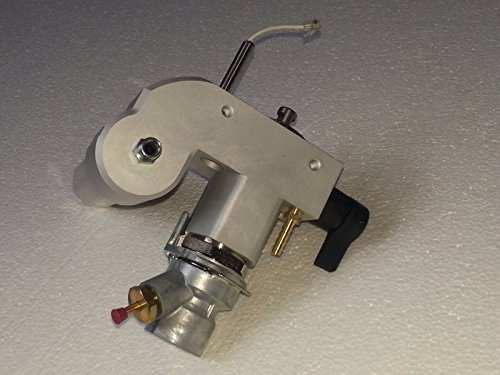
Titan 805-207A Complete Pump Fluid Section Impact 440, 540, 640 OEM Repair Part
- Genuine Titan Replacement Part: Titan 805-207A pump fluid section
- Compatible Models: Impact 440, 540, 640 skid units
- Complete Pump Fluid Section: Includes all necessary parts
As an affiliate, we earn on qualifying purchases.
As an affiliate, we earn on qualifying purchases.
Preparing for Removal
The user inspects the piston rod and seals for wear or damage and replaces them if necessary when preparing for the removal of the fluid section on the Titan 440 airless paint sprayer. This step is crucial for removing the fluid section safely and ensuring the proper functioning of the paint sprayer.
Additionally, the importance of proper cleaning cannot be overstated. Before removing the fluid section, it is essential to clean all components thoroughly to remove any built-up paint or debris. This includes checking the inlet and outlet valves for blockages, examining the intake tube and filter for clogs or damage, and ensuring all connections and fittings are tight and secure.
Inspecting and Replacing Components
Inspecting and replacing components involves checking for wear or damage in the piston rod and seals, and replacing them if necessary. This step is crucial in maintaining the optimal performance of the fluid section on the Titan 440 airless paint sprayer.
Here are the key steps to follow:
-
Inspect the piston rod and seals for signs of wear or damage, such as cracks or leaks. Replace them if necessary to ensure proper functioning of the sprayer.
-
Check the inlet and outlet valves for any debris or blockages. Clean or replace them as needed to prevent clogs and ensure smooth paint flow.
-
Examine the intake tube and filter for any clogs or damage. Clean or replace them if required to maintain proper paint filtration.
-
Ensure all connections and fittings are tight and secure. Tighten or replace any loose connections or leaks to prevent paint leaks and ensure efficient operation.
Turning off and Releasing Pressure
To safely turn off and release pressure from the sprayer, the user must locate the power switch, unplug the cord, and carefully handle it to avoid any damage. This is an important safety precaution to prevent accidental spraying and potential injury. Additionally, troubleshooting techniques can be employed to address any issues that may have caused pressure buildup in the sprayer. By following proper procedures, users can avoid damage to the sprayer and ensure its optimal performance.
Table: Safety Precautions and Troubleshooting Techniques
| Safety Precautions | Troubleshooting Techniques |
|---|---|
| Turn off power switch on the sprayer | Identify the cause of pressure buildup |
| Unplug the power cord | Inspect seals and gaskets for wear or damage |
| Handle the cord carefully | Check inlet and outlet valves for blockages |
| Switch off and unplug the sprayer | Examine intake tube and filter for clogs |
| Locate pressure relief valve | Use appropriate cleaning solutions and techniques |
| Turn valve counterclockwise to release pressure | Tighten or replace connections and fittings |
Following these safety precautions and troubleshooting techniques will help users maintain the safety and functionality of their Titan 440 airless paint sprayer.
Disconnecting Hoses
Using pliers or a wrench, the user can loosen the hose clamps to disconnect the inlet and outlet hoses from the connections near the fluid section. Removing hoses is an important step in properly maintaining the fluid section on a Titan 440 airless paint sprayer.
Here are some key points to consider:
-
Ensure safety: Before removing hoses, always turn off the power switch and unplug the sprayer to prevent accidents.
-
Use the right tools: Pliers or a wrench will help loosen the hose clamps effectively.
-
Slide the clamps: Once the clamps are loose, slide them away from the connections to allow for easy hose removal.
-
Carefully disconnect: Gently pull the hoses away from the connections to avoid damaging the fluid section.
Proper hose maintenance, including removing hoses when necessary, is crucial for the optimal performance of your paint sprayer.
Cleaning Surfaces and Parts
After disassembling the fluid section, the user can wipe down all surfaces with a damp cloth to remove built-up paint or debris. For stubborn residue, a mild detergent or paint thinner can be used. It is important to rinse the surfaces thoroughly after cleaning. Special attention should be given to the filters to ensure they are free from clogs and debris. Seals, gaskets, and the piston rod should be inspected for wear or damage and replaced if necessary. The inlet and outlet valves should be checked for debris or blockages and cleaned or replaced accordingly. The intake tube and filter should also be examined for clogs or damage and cleaned or replaced as required. Finally, all connections and fittings should be tightened or replaced if there are any leaks or loose connections.
| Cleaning Techniques | Removing Stubborn Residue |
|---|---|
| Wipe with damp cloth | Use mild detergent or paint thinner |
| Rinse thoroughly | Ensure filters are free from clogs and debris |
| Inspect seals, gaskets, and piston rod | Check inlet and outlet valves |
| Clean or replace as necessary | Examine intake tube and filter |
| Tighten or replace connections and fittings | Clean or replace as required |
Replacing Seals and Gaskets
Inspecting the seals and gaskets for wear or damage is crucial when replacing them in the fluid section of the sprayer. Here are some seal and gasket replacement techniques to follow:
-
Carefully remove the old seals and gaskets using the appropriate tools, such as a seal puller or flathead screwdriver.
-
Clean the area where the old seals and gaskets were located to ensure a proper fit for the new ones.
-
Install the new seals and gaskets, making sure they are aligned correctly and securely in place.
-
Dispose of the removed parts properly by following local regulations for hazardous waste disposal.
Checking Valves and Filters
The technician checks the valves and filters for any debris or blockages and cleans or replaces them if necessary. Ensuring the functionality of the valves is crucial for the proper operation of the Titan 440 airless paint sprayer. Any debris or blockages in the valves can lead to paint flow issues or even complete failure. Regular maintenance of the valves is essential to prevent these problems.
Additionally, the technician recognizes the importance of regular filter maintenance. The filters in the sprayer play a vital role in preventing contaminants from entering the fluid section and clogging the valves or other components. Cleaning or replacing the filters on a regular basis ensures optimal performance and extends the lifespan of the sprayer.
Inspecting Pressure Control
The technician checks the pressure control knob and gauge for accuracy and replaces them if not functioning properly. Regular inspection of the pressure control is important to ensure optimal performance of the Titan 440 airless paint sprayer.
Here are some common issues with pressure control and how to troubleshoot them:
-
Inaccurate pressure readings: If the pressure gauge is not showing the correct pressure, it may need to be recalibrated or replaced. The technician can use a separate pressure gauge to compare readings and adjust accordingly.
-
Pressure fluctuations: If the pressure control knob is causing fluctuations in the paint flow, it may be due to a clogged or worn-out valve. Cleaning or replacing the valve can help resolve this issue.
-
Loss of pressure: If the pressure control knob is unable to maintain a consistent pressure, it may be a sign of a leak or a faulty seal. The technician should inspect all connections and fittings for leaks and tighten or replace them as needed.
-
No pressure output: If there is no pressure output from the sprayer, the pressure control knob may be completely non-functional. In this case, the technician should replace the pressure control knob and gauge to restore proper functionality.
Ensuring Tight and Secure Connections
To ensure optimal performance, the technician must make sure that all connections and fittings are tight and secure. Checking for leaks and securing fittings is crucial in maintaining the efficiency of the Titan 440 airless paint sprayer.
Leaks can result in paint wastage and uneven application, while loose fittings can lead to improper paint flow and potential damage to the sprayer. The technician should carefully inspect all connections, such as the inlet and outlet hoses, and use appropriate tools like wrenches or pliers to tighten them if necessary. It is important to ensure a proper seal to prevent leaks.
Additionally, the technician should check for any signs of wear or damage on the fittings and replace them if needed. By ensuring tight and secure connections, the technician can maintain the integrity and performance of the Titan 440 airless paint sprayer.
Reassembling and Testing
After carefully placing the fluid section back into its original position, the technician double-checks that all screws are tightened properly to avoid leaks or malfunctions.
To ensure the successful reassembly of the fluid section on a Titan 440 airless paint sprayer, the following tips should be followed:
- Test the sprayer for any unusual noises or vibrations when turned on.
- Check that the paint flow is consistent and there are no clogs or blockages.
- Troubleshoot any issues during the testing phase to save time and prevent future problems.
- Continuously monitor the pressure control knob and pressure gauge for accuracy.
Troubleshooting and Maintenance Tips
When troubleshooting and performing maintenance on the Titan 440 airless paint sprayer, it is important for the technician to regularly clean and inspect the filters for clogs and debris. This helps to prevent blockages in the fluid section, ensuring optimal paint flow and preventing damage to the sprayer. In addition to cleaning the filters, there are several best practices for maintaining the fluid section. These include regularly inspecting and replacing worn or damaged seals, gaskets, and valves, as well as checking the pressure control knob and gauge for accuracy. It is also important to ensure that all connections and fittings are tight and secure to prevent leaks. By following these maintenance tips, technicians can avoid common troubleshooting problems and ensure the longevity and performance of the Titan 440 airless paint sprayer.
| Common Troubleshooting Problems | Best Practices for Maintaining the Fluid Section |
|---|---|
| Low paint flow | Regularly clean and inspect filters |
| Clogs or blockages | Inspect and replace worn or damaged seals |
| Leaks or loose connections | Check pressure control knob and gauge accuracy |
| Inaccurate pressure | Ensure all connections and fittings are secure |
| Damaged seals or gaskets | Replace worn or damaged parts as necessary |
Frequently Asked Questions
What Are Some Troubleshooting Tips for Addressing Pressure Buildup in the Titan 440 Airless Paint Sprayer?
To troubleshoot pressure buildup in the Titan 440 airless paint sprayer, here are some tips.
First, check for any clogs or blockages in the inlet and outlet valves and clean or replace them as needed.
Ensure that the intake tube and filter are not clogged or damaged.
Make sure all connections and fittings are tight and secure to prevent leaks.
Lastly, check the pressure relief valve and troubleshoot any issues that may have caused the pressure buildup.
How Often Should the Filters in the Fluid Section Be Replaced?
The filters in the fluid section of the Titan 440 airless paint sprayer should be replaced regularly to ensure optimal performance. It is recommended to replace the filters at least once every 50 hours of operation or whenever they become clogged with paint or debris.
Regular filter maintenance is essential for preventing clogs and maintaining a consistent paint flow. By following the recommended replacement interval, users can ensure that their paint sprayer operates efficiently and delivers high-quality results.
Are There Any Specific Cleaning Solutions Recommended for Removing Stubborn Residue From the Fluid Section?
Cleaning solutions specifically formulated for removing stubborn residue from the fluid section of the Titan 440 airless paint sprayer are recommended. These cleaning solutions are designed to effectively dissolve and remove paint buildup and debris without damaging the components of the fluid section.
It is important to follow the manufacturer’s instructions when using these cleaning solutions to ensure safe and effective cleaning.
Regularly cleaning and removing residue from the fluid section helps maintain optimal performance and prolong the lifespan of the paint sprayer.
What Are the Potential Consequences of Not Properly Tightening the Screws During Reassembly?
Not properly tightening the screws during reassembly can have several potential consequences.
Firstly, it can lead to leaks in the fluid section, causing paint to spray unevenly or not at all.
Secondly, it can result in the fluid section becoming loose and unstable, leading to vibrations and potential damage to the sprayer.
Lastly, it can affect the overall performance and efficiency of the paint sprayer, compromising the quality of the paint application.
Therefore, it’s crucial to ensure that all screws are tightened properly during reassembly to avoid these consequences.
Can the Fluid Section Be Removed and Cleaned Without Disconnecting the Power Source?
The cleaning procedure for the fluid section of the Titan 440 airless paint sprayer does not require disconnecting the power source. However, it is important to follow safety precautions and ensure the power switch is turned off and the sprayer is unplugged.
The fluid section can then be removed and cleaned as necessary, taking care to inspect and replace any worn or damaged parts.
This process helps maintain optimal performance and paint application.
Conclusion
In conclusion, maintaining and removing the fluid section on a Titan 440 Airless Paint Sprayer is a crucial aspect of ensuring optimal performance and longevity of the equipment.
By following the outlined steps and regularly inspecting and replacing worn components, users can enjoy a smooth and efficient painting experience.
While the process may seem daunting, proper safety precautions and attention to detail can make it a straightforward task.
With this knowledge, users can confidently tackle any maintenance or cleaning needs, allowing them to fully enjoy the benefits of their paint sprayer.

Drenched in creativity and armed with a fountain pen, Isolde weaves words as gracefully as a painter strokes their canvas. A writer for Paint Sprayer Zone, her passion for colors, textures, and spaces finds a harmonious blend with her profound knowledge of painting tools and techniques.
Having grown up in a family of artists, Isolde’s tryst with paints began early. While her relatives expressed themselves on canvas, Isolde found her medium in words. She dedicated herself to chronicling the world of painting, understanding the nuances of each tool, and the artistry behind every spritz of a paint sprayer.