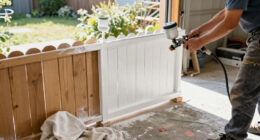
Use an airless paint sprayer to coat a DIY project, such as a fence, wall, or cabinet, with an even layer of paint, then clean the machine safely. This beginner guide covers preparation, test spraying, application, and cleanup. Allow about 2–4 hours for a small project, including setup and cleanup; drying time is additional.

Get business pricing on tools and workshop supplies
- Business-only prices and quantity discounts
- Tax-exempt purchasing
- Multiple users, one account, clear invoices

Graco Magnum X5 Airless Paint Sprayer
- ✔ Brand: Graco
- ✔ Model: Magnum X5 (262800)
- ✔ Maximum pressure: 3000 PSI

Graco Magnum Project Painter Plus Paint Sprayer
- ✔ Brand: Graco
- ✔ Model: 257025
- ✔ Recommended project size: Up to 5 gallons

InoKraft NEO Airless Paint Sprayer Kit, 3000 PSI, 0.26 GPM
- ✔ Brand: InoKraft
- ✔ Model: NEO (IK01099)
- ✔ Maximum pressure: 3000 PSI
Difficulty: Beginner | Time: 2–4 hours for setup, painting, and cleanup; longer for large projects
What You’ll Need
Tools & Materials:
- Airless paint sprayer with the correct spray tip and guards
- Paint compatible with the sprayer
- Paint strainer and clean bucket
- Drop cloths, masking film, painter’s tape, and a stir stick
- Safety glasses, protective clothing, and a respirator rated for the product and spray conditions
- Water for water-based paint or the manufacturer-approved solvent for oil-based paint
- Rags and a suitable cleaning brush
Knowledge:
- Basic ability to read product and sprayer instructions
- Ability to identify whether the paint is water-based or oil-based
- Basic hand-tool skills for removing or masking nearby hardware
Read the paint label and sprayer manual before setup. Confirm that the sprayer, hose, tip, and cleaning fluid suit the coating. Check local rules for solvent disposal. Do not spray where people, pets, vehicles, or unprotected surfaces may be exposed to airborne paint.
Graco Magnum X5 Airless Paint Sprayer
The Magnum X5 is the most versatile choice here for DIYers tackling several outdoor surfaces or a small home. Its recommended project size reaches 10 gallons, twice the Project Painter Plus limit, and its maximum hose length of 75 feet offers more reach than either the Plus or the NEO’s listed 25-foot hose. That flexibility can matter when moving a sprayer around a property or working at height.Both Graco models draw directly from 1- or 5-gallon buckets and support adjustable pressure for spraying paint or stain without thinning, so the X5’s advantage is primarily greater project scope and reach. It still arrives with a 25-foot hose, so longer runs require a separately obtained hose. Its 15-pound weight also makes it less convenient to carry than the 10.1-pound NEO, and the 10-gallon recommendation makes it a poor match for buyers seeking only a small, occasional touch-up tool.
Pros:
- Recommended for projects up to 10 gallons.
- Supports hose lengths up to 75 feet.
- Adjustable pressure supports spraying paint or stain without thinning.
- Flexible suction tube draws directly from 1- or 5-gallon buckets.
Cons:
- The recommended project size is still limited to 10 gallons.
- The included hose is 25 feet, so using the full supported reach requires another hose.
- At 15 pounds, it is heavier than the InoKraft NEO.
Best for: DIYers painting larger areas such as siding, fences, decks, or a small home who can use the higher project limit and longer supported hose.
Not ideal for: Buyers focused on small jobs, the lightest carry weight, or getting a hose longer than 25 feet in the box.
Bottom line: Choose the Magnum X5 when your DIY plans justify the lineup’s largest stated project capacity and hose reach.
“Choose the Magnum X5 when your DIY plans justify the lineup’s largest stated project capacity and hose reach.”
Graco Magnum Project Painter Plus Paint Sprayer
For a single, clearly bounded job, the Project Painter Plus offers a sensible middle ground between the X5’s larger project capacity and the NEO’s lighter kit. It is designed for projects up to 5 gallons, with a flexible suction tube that draws from either a 1- or 5-gallon bucket. That setup suits jobs like a shed, deck, fence, or ceiling where feeding paint from a bucket is more convenient than repeatedly filling a smaller container.Its pressure adjusts for paints and stains without thinning, and the metal SG2 spray gun is included. The tradeoff is that the X5 provides a 10-gallon recommendation and supports up to 75 feet of hose, compared with the Plus’s 5-gallon project scope and 50-foot maximum. Yet the Plus also ships with a 25-foot hose, so its longer reach is not available from the included hose alone. At 15 pounds, it is also heavier than the NEO. We’d choose it when 5 gallons is enough and the bucket-fed arrangement matters more than expansion room.
Pros:
- Adjustable pressure supports spraying paints and stains without thinning.
- Flexible suction tube draws from 1- or 5-gallon buckets.
- Supports up to 50 feet of hose.
- Includes a metal SG2 spray gun and setup and storage accessories.
Cons:
- Designed for projects up to 5 gallons, below the X5’s 10-gallon recommendation.
- The included hose is 25 feet, shorter than its maximum supported length.
- At 15 pounds, it is heavier than the InoKraft NEO.
Best for: DIYers with a deck, shed, fence, ceiling, or other home project expected to use up to 5 gallons of coating.
Not ideal for: People planning jobs beyond 5 gallons, needing the longest supported hose reach, or prioritizing a lighter unit.
Bottom line: Pick the Project Painter Plus for a defined DIY job that fits its 5-gallon scope and bucket-fed setup.
“Pick the Project Painter Plus for a defined DIY job that fits its 5-gallon scope and bucket-fed setup.”
InoKraft NEO Airless Paint Sprayer Kit, 3000 PSI, 0.26 GPM
The InoKraft NEO stands out for its lighter 10.1-pound body and ready-to-start accessory bundle. Along with the sprayer and 25-foot hose, the kit lists a 12-inch extension, 515 tip, masking film and tape, touch-up brush, and cleaning supplies. For a DIYer assembling tools for an upcoming painting job, those extras help cover preparation and touch-ups as well as spraying. Built-in storage and a Flush-Ease valve also address the practical work of keeping equipment organized and cleaning it afterward.Compared with the Graco models, the NEO is notably easier to carry and comes with more of the described masking and touch-up materials. The tradeoff is that the provided information does not specify a recommended project-size limit or a longer supported hose length; the Gracos list both. The NEO is described as compatible with latex paint, acrylic, stain, and primer when the coating allows, but that does not mean every coating can be sprayed without thinning. Buyers who need a clearly stated project capacity or extended hose reach may find the X5 or Project Painter Plus easier to match to a larger job.
Pros:
- Weighs 10.1 pounds, less than either Graco model.
- Includes masking film and tape, a touch-up brush, and cleaning tools.
- Built-in storage helps organize the gun, hose, tip, and wrench.
- Flush-Ease valve supports cleanup with minimal disassembly.
Cons:
- Coating compatibility depends on the material; thinning-free use is not guaranteed for every coating.
- Its 25-foot hose is the only hose length specified in the supplied details.
- No recommended project-size limit is stated in the supplied details.
Best for: DIYers who want a lighter airless unit and a starter kit with masking, touch-up, and cleaning supplies for medium to large home projects.
Not ideal for: Buyers who need a stated maximum project size, longer supported hose reach, or guaranteed thinning-free use with a particular coating.
Bottom line: Choose the NEO when a lighter carry and a broad starter kit matter more than documented project capacity and extended hose reach.
“Choose the NEO when a lighter carry and a broad starter kit matter more than documented project capacity and extended hose reach.”
As an Amazon Associate we earn from qualifying purchases.
Before You Start
Set up ventilation and control overspray. Mask floors, windows, fixtures, plants, and nearby objects; spray can carry well beyond the surface. Wear eye protection and the respirator specified by the paint label. Keep the spray pointed away from people and never put a hand or finger in front of the tip. High-pressure injection injuries can occur even when the wound looks small. If paint penetrates skin, seek emergency medical care and tell clinicians it may be a high-pressure injection injury.
Relieve pressure before changing the tip, clearing a blockage, or cleaning the gun. Follow the sprayer manual’s pressure-relief procedure. Keep the trigger lock engaged when you are not actively spraying.
Step-by-Step Instructions
Step 1: Prepare the surface and work area
Remove loose paint, dirt, grease, and dust from the surface. Repair holes or cracks, sand where needed, and allow the surface to dry. Mask everything that should stay paint-free, cover the floor, and place the workpiece so you can reach it without stretching across wet paint. Arrange ventilation without directing airflow or dust onto the finish.
Tip:For a large open area, plan where you will start and finish so you can move steadily without stepping through wet paint or snagging the hose.
Check: The surface is clean, dry, and ready for its coating; nearby areas are covered and ventilation is in place.
Step 2: Choose and prepare the paint
Check the paint label for sprayer compatibility and any thinning instructions. Stir the paint thoroughly without whipping air into it. Strain it into a clean bucket to catch dried skin, grit, or other debris that could clog the tip. Thin the paint only if the label or sprayer instructions call for it, and use the specified thinner.
Tip:Do not guess at thinning ratios. Excessive thinning can reduce coverage and change the finish.
Check: The coating is mixed and strained, and you know which fluid to use for priming and cleanup.
Step 3: Assemble and prime the sprayer
Fit the suction tube, return tube, hose, gun, guard, and spray tip as directed in the manual. Keep the trigger locked. Place the suction tube in the paint and the return tube in a waste bucket. Set the sprayer to its priming or low-pressure setting, then run it until paint flows steadily from the return tube. Switch to spray mode and follow the manual to fill the hose and gun, collecting the initial fluid in the waste bucket.
Tip:Keep the return tube secured in the waste bucket. A loose tube can move as fluid begins to flow.
Check: Paint flows without obvious air gaps, and the sprayer does not leak from its connections.
Step 4: Test the spray pattern
Install the correct tip for the coating and surface, using the tip chart or sprayer manual. Point the gun at a piece of scrap material or a masked test area. Unlock the trigger, hold the gun at the recommended distance—often about 12 inches—and spray a short pass while moving your whole arm. Check the pattern and adjust pressure within the manual’s recommended range until the fan is even and the edges are not heavily streaked. Lock the trigger before making adjustments to the tip or guard.
Tip:If the pattern has heavy tails at the edges, check pressure, tip condition, and paint preparation. Do not compensate by spraying closer or slowing excessively.
Check: The test pass has an even fan, with no sputtering or persistent heavy stripes.
Step 5: Spray the project in steady passes
Hold the gun perpendicular to the surface and begin moving before you squeeze the trigger. Keep a consistent distance and speed, overlap each pass by about half the fan width, and release the trigger after you move past the edge. Work in manageable sections, keeping the hose clear of wet paint. Apply the number of coats and recoat intervals listed on the paint label. Inspect the surface in good light as you go, without touching wet paint.
Tip:Starting or stopping while aimed at the surface can create thick spots. Keep the gun moving through each pass and use the trigger at the pass ends.
Check: The wet coating appears even, with no obvious missed strips, runs, or heavy buildup. The paint label’s coverage and recoat directions are being followed.
Step 6: Relieve pressure and clean the sprayer
Turn off the sprayer and follow its pressure-relief procedure before removing the tip or guard. Put the suction tube and return tube into the correct cleaning fluid: water for many water-based paints, or the manufacturer-approved solvent for other coatings. Circulate and flush the system into a waste container until the discharged fluid runs clear, following the manual. Clean the gun, guard, and tip as directed. Dispose of paint and cleaning fluid according to the product label and local rules; do not pour them into a drain.
Tip:Use only the cleaning fluid approved for the coating and equipment. Never leave paint sitting in the pump or hose after the job.
Check: The fluid leaving the system runs clear, removable parts are clean, and the sprayer is stored as its manual directs.
Step 7: Inspect the dried finish
Let the coating dry for the time stated on its label before judging the final appearance or applying another coat. Check the surface from several angles in good light. If you find a run or rough spot, wait until the paint is dry, sand or smooth it as appropriate, remove dust, and recoat according to the label.
Tip:Touch-dry does not always mean ready for sanding, recoating, or normal use. Follow the stated drying and recoat times.
Check: The dry surface has consistent coverage and sheen, with no uncorrected runs, missed areas, or rough debris.
Common Mistakes to Avoid
- Spraying without masking nearby surfaces. — Cover floors, openings, fixtures, and objects beyond the immediate work area. Airborne paint can travel farther than expected.
- Holding the gun too close, too far away, or still while spraying. — Practice on scrap, keep the recommended distance and a steady pace, and start moving before pulling the trigger.
- Thinning paint by guesswork or skipping the strainer. — Follow the paint label and sprayer manual, then strain the coating into a clean bucket to reduce clogs.
- Opening the gun or changing the tip while the system is pressurized. — Lock the trigger and complete the manual’s pressure-relief procedure before touching the tip, guard, or hose connection.
Troubleshooting
Problem: The spray pattern spits, pulses, or has gaps.
Solution: Release the trigger, lock it, and follow the pressure-relief procedure. Check the paint level, suction connections, strainer, and tip for blockage; clean or reverse the tip as the manual directs, then test on scrap.
Problem: The pattern has heavy stripes along its edges.
Solution: Check that the tip is clean and suitable for the coating. Raise pressure only within the recommended range and test again. If the tails remain, clean or replace a worn tip.
Problem: Paint runs or sags on the surface.
Solution: Stop spraying that area. Allow the paint to dry as directed, smooth the run, remove dust, and apply a lighter coat. Keep the gun moving and avoid excessive overlap.
Problem: Paint appears on masked areas or beyond the work zone.
Solution: Stop and expand the masking. Check gaps in film or tape and account for airflow carrying overspray. Resume only when people and nearby items are protected.
What Success Looks Like
The project has an even, fully dried coating with no missed strips, persistent heavy spray marks, or uncorrected runs. The sprayer, gun, tip, and guard have been cleaned according to the manual, and paint waste has been handled according to its label and local rules.
Next Steps
Keep the paint label and sprayer manual with your project notes, including the tip used and any approved thinning. Store the sprayer clean and protected as directed. Before the next job, inspect the hose and fittings for damage, confirm the tip is in good condition, and repeat the test spray on scrap.
Frequently Asked Questions
Do I need to thin paint for an airless sprayer?
Not always. Check the paint label and sprayer instructions first. Thin only when directed, using the specified product and amount; then strain the paint before loading it.
How far should I hold the spray gun from the surface?
Use the distance stated in your sprayer manual; about 12 inches is a common starting point. Confirm the pattern on scrap because the right distance also depends on the tip and coating.
Can I spray indoors?
Yes, when the coating and sprayer are suitable for indoor use and you can protect the room and provide the ventilation required by the product label. Mask generously and keep people and pets away from airborne paint.
What should I do if the tip clogs?
Release the trigger, lock it, and follow the pressure-relief procedure. Use the tip’s reverse or cleaning method only as described in the manual, then test the pattern on scrap.
Can I leave paint in the sprayer between coats?
Follow the sprayer manual and paint label for pauses. Do not leave the system unattended or let paint dry in the pump, hose, or gun. Clean the equipment after the job using the approved fluid.