TL;DR
A closet can become a surprisingly good audio booth when you focus on strategic placement and sealing leaks, rather than just adding foam. Proper ventilation and door sealing are key to keeping it cool and quiet. In small spaces, addressing sound leaks and reflection points makes all the difference.
Ever tried to record in a tiny closet and wondered why it still sounds like you’re inside a box? The real secret isn’t just slapping foam on the walls. It’s about where you put your gear, how you block sound leaks, and making sure your rig doesn’t turn into a tiny furnace. If you want your recordings crisp and your workspace quiet, you need a game plan that combines smart placement, proper dampening, and good ventilation.
By the end of this, you’ll know how to turn that cramped closet into a nearly professional sound booth — without blowing your budget or tearing down walls. Ready to make your small space work for you? Let’s get into it.
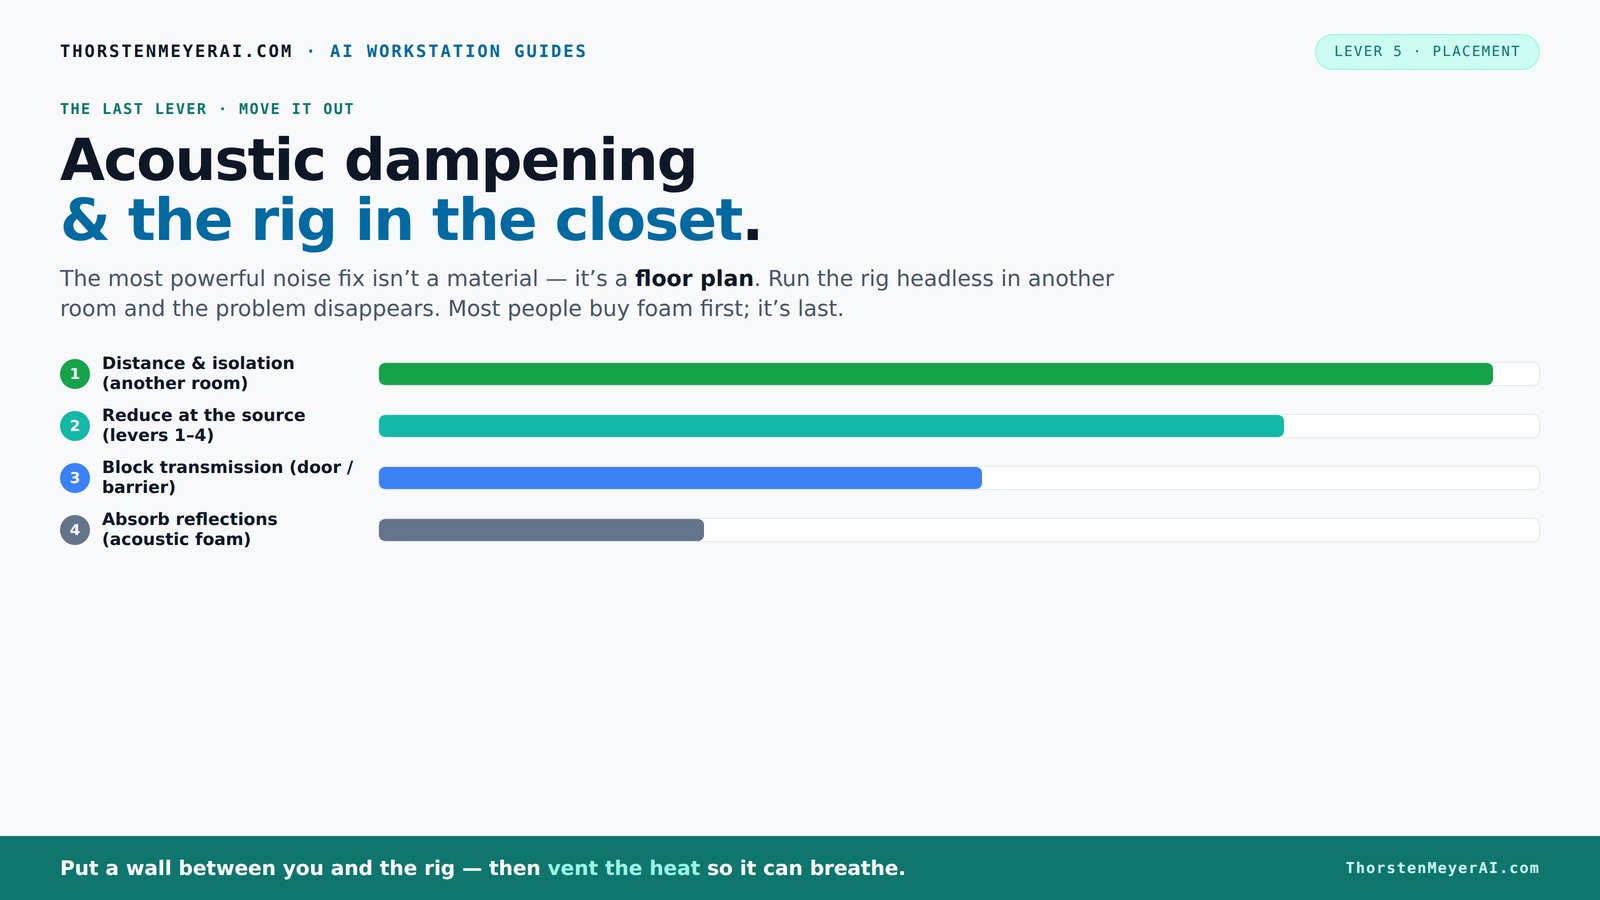
Acoustic dampening
& the rig in the closet.
The most powerful noise fix isn’t a material — it’s a floor plan. A rig you can’t hear because it’s in another room beats any amount of foam. Tap the approaches in Part 1 to see what actually works.
(another room)
(levers 1–4)
(door / barrier)
(acoustic foam)
Contain the noise, not the heat
Key Takeaways
- Moving your rig into another room is the most effective noise reduction method, especially for AI workstations.
- Sealing gaps and using ventilation are essential when placing a rig in a closet or cabinet to prevent overheating.
- Prioritize treating reflection points and sealing sound leaks over covering every surface with foam.
- Acoustic dampening reduces echo; soundproofing blocks sound leaks. Both are necessary but serve different roles.
- Proper mic placement can dramatically improve vocal clarity, even with minimal treatment.

Focusound 52 Pack Acoustic Foam Panels 1" x 12" x 12" Sound Proof Foam Panles Soundproofing Noise Cancelling Wedge Panels for Home Office Recoding Studio with 300PCS Double-Side Adhesive
- Soundproofing Design: Triangular grooves for noise absorption
- Includes Adhesive Tape: 300pcs double-sided adhesive for easy installation
- Easy Shape Recovery: Reforms after soaking in water
As an affiliate, we earn on qualifying purchases.
As an affiliate, we earn on qualifying purchases.
Why Moving Your Rig Matters More Than Foam Walls
The biggest leap in quieting your setup? Distance. A rig in another room, or even another part of the house, can be a thousand times quieter than the same hardware sitting on your desk. If your inference rig lives in a closet or basement, the noise simply doesn’t reach you—problem solved before you even treat the space.
This approach works because sound weakens with distance. When you SSH into your machine or point your mic remotely, the noise isn't just muffled; it’s practically gone. Think of it like a loud neighbor who’s just out of earshot—farther away, the noise fades into the background.
Of course, this requires a reliable network connection and proper ventilation, but it’s the most efficient way to keep your workspace silent and your rig cool.
The 'Rig in the Closet' Setup: How to Keep It Cool and Quiet
Placing a high-powered rig in a closet sounds perfect—until you realize trapped heat is a serious problem. A sealed space with no airflow can turn into an oven. A GPU running at 80°C or higher will throttle, fans will scream, and your hardware will wear out faster.
The secret is ventilation. You need active airflow—think quiet exhaust fans, vents, or ducting—to let hot air escape. For more tips, see this guide on acoustic dampening and setup. Without it, the temperature climbs, and your noise levels shoot up as fans spin faster to cool things down.
Use a combination of passive vents and a small, quiet fan to draw heat out. You can also learn more about indoor gardening and ventilation to help with airflow solutions. For ultimate control, consider a purpose-built soundproof cabinet with ducting and temperature sensors. It’s a small investment that keeps your hardware happy and your noise levels down.
Proper ventilation isn’t just about cooling; it also prevents heat-induced fan noise. Overheated components tend to ramp up their fans, which can negate your efforts at acoustic treatment. Balancing cooling needs with soundproofing is a nuanced process—aim for a system that quietly maintains safe temperatures while minimizing noise.
How to Seal Sound Leaks — Doors, Outlets, and Gaps
Sound escapes through cracks, gaps, and poorly sealed doors—biggest sound leaks in a tiny space. For sealing tips, check out this article on sealing sound leaks. The first step? Seal every crack with weatherstripping or draft stoppers. Use blankets or foam to block gaps around the door, especially at the bottom and sides.
But why does sealing matter so much? Because even tiny gaps act like open windows for sound to escape or enter. When you seal these, you’re effectively creating a controlled environment, reducing external noise intrusion and preventing your own sound from leaking out. This not only improves recording quality but also minimizes disturbance to others nearby.
For outlets and vents, install gaskets or cover plates to prevent sound from leaking through wiring holes. Think of it as building a fortress around your space—every crack sealed is a step toward a more controlled acoustic environment, where your recordings are clearer and outside noise is minimized.
Acoustic Dampening vs. Soundproofing: What’s the Difference?
Acoustic dampening and soundproofing are often confused, but they serve different purposes. Dampening materials like foam and blankets absorb reflections and echoes inside your space. They make your voice sound clearer and reduce reverberation, which is crucial for recording accuracy and clarity.
Soundproofing, on the other hand, blocks sound from leaving or entering the space. It involves sealing gaps, adding dense barriers, or installing specialized panels to prevent noise leakage. Think of dampening as improving internal sound quality, while soundproofing is about isolating your space from the outside world.
In a closet setup, focus first on dampening to improve the sound of your recordings—less echo means more professional-sounding audio. Then, add sealing and barriers if outside noise contaminates your recordings or if you want to prevent your sound from disturbing others. Both are important, but understanding their roles helps you prioritize effectively based on your goals and budget.
Where to Treat First: Walls, Door, or Corners?
In tiny closets, reflection points and low-frequency buildup are the main issues. You might find this resource on acoustic treatment helpful. Start by treating the door and nearby hard surfaces, since they’re the biggest sound leaks and reflection sources. Sealing the door with weatherstripping and placing foam panels at reflection points behind the mic can dramatically reduce early reflections and improve clarity.
Next, focus on corners and ceiling areas where bass can bounce and create a muddy sound. Use bass traps or dense foam in these spots; they help tame low-frequency resonances that can make your recordings boomy or indistinct.
Walls matter, but in small spaces, their treatment yields diminishing returns compared to sealing gaps and addressing reflection points near the mic. Prioritizing these areas ensures you get the biggest improvements in sound quality without over-investing in less critical spots.
Example: Placing a thick blanket over the door and adding foam panels at reflection points behind the mic can dramatically improve sound clarity, making your recordings more professional and less echoey.
How Much Foam or Blanket Coverage is Enough?
More isn’t always better. In a small closet, strategic placement beats covering every surface with foam. Focus on reflection points—behind the mic, on the ceiling, and near hard surfaces—since these are where reflections bounce and muddy your sound.
A few thick blankets or a handful of foam panels placed at key reflection points can make a noticeable difference. For example, hanging a couple of 2x4-foot panels at reflection points and draping a heavy blanket over the door can significantly reduce reverb and sound leaks.
Remember: sealing gaps and blocking leaks have a bigger impact than covering every inch with foam. Overdoing it can even make the space sound unnatural or dead. Aim for about 30-50% coverage of reflective surfaces, focusing on critical points that influence your recordings most.
Handling the Room’s Low-End Buildup and Boominess
Small closets often suffer from bass buildup—standing waves that make your recordings boomy and muddy. The fix? Bass traps in corners and dense foam at low frequencies. Bass traps absorb low-frequency energy, preventing it from bouncing around and creating muddiness.
Placing thick acoustic panels or bass traps in the corners where walls meet is crucial because these are the primary spots where low-end energy accumulates. Additionally, angling the mic slightly or elevating it can help reduce the impact of low-frequency reflections. Consider also using a combination of a high-pass filter on your microphone or audio interface to cut unnecessary low frequencies, which can further clean up your sound.
Example: Installing a dense bass trap in the corner behind your desk can significantly reduce low-frequency muddiness, giving your voice more clarity and presence. Recognizing and addressing these low-end issues ensures your recordings are balanced and professional-sounding.
Mic Placement Tips for Clear, Professional Sound
The best way to get a clean voice recording? Start with mic placement. Position your mic about 6-12 inches from your mouth, slightly off-axis. Face it toward your mouth but avoid pointing directly at your nose or chest. This positioning reduces proximity effect and plosives, producing a warmer, clearer sound.
Place the mic so it’s not too close to reflective surfaces like desks or shelves, which can cause unwanted echoes. Use a boom arm or stand to keep it steady, and consider a pop filter to reduce plosive sounds and sibilance.
Example: Positioning your microphone in front of you, facing slightly downward, and a few inches back from your mouth captures warm, clear vocals without harsh reflections. Proper placement minimizes room reflections and maximizes clarity, essential for professional-sounding recordings.
Frequently Asked Questions
What’s the most effective way to reduce noise from my AI rig?
The simplest and most effective method is to move your rig into another room or closet. This distance alone can cut noise by 90% or more, making additional treatment almost unnecessary.Do I need foam panels or blankets for my closet booth?
While foam panels help reduce echo and reflections, sealing gaps and blocking sound leaks are more important for noise control. Use blankets or foam strategically at reflection points and door gaps for best results.How do I prevent my closet from overheating?
Install active ventilation—passive vents plus quiet exhaust fans—and avoid fully sealing the space. Consider a purpose-built soundproof cabinet with ducting or an AIO cooler with external radiators to keep temperatures in check.Where should I place my microphone for the best sound?
Position your mic about 6-12 inches from your mouth, slightly off to the side, facing your mouth but away from reflective surfaces. Use a boom arm for stability and a pop filter to improve clarity.Will sealing my closet door block outside noise?
Sealing gaps with weatherstripping or blankets can significantly reduce sound leaks. For better results, consider adding a heavy blanket or a door seal kit designed for soundproofing.Conclusion
Transforming a tiny closet into a quiet, effective audio space is less about endless foam and more about smart placement, sealing leaks, and managing heat. Your best move? Keep the rig in a different room if possible, and if not, focus on sealing gaps and ventilating properly. Good acoustics and a cool rig go hand in hand.
Think of your closet as a blank canvas—what matters most is where you focus your efforts. With a little planning, you can record professional-sounding audio without tearing down your walls or spending a fortune. Your workspace will thank you—and so will your ears.