
To spray exposed beams and rafters, start by preparing your workspace with drop cloths and taping off nearby areas. Choose a high-quality HVLP sprayer with adjustable settings, and test it on scrap wood to perfect your technique. Hold the spray gun 6 to 12 inches from the surface, using smooth overlapping strokes for even coverage. Maintain a consistent pace and proper distance to avoid drips or uneven patches. If you keep going, you’ll discover more tips for achieving a flawless finish.
Key Takeaways
- Use a high-quality HVLP sprayer with adjustable settings and test on scrap wood for optimal spray pattern.
- Prepare the workspace by covering surrounding areas and cleaning the beams thoroughly before spraying.
- Maintain a steady distance of 6-12 inches from beams, using smooth, overlapping strokes for even coverage.
- Spray in sections along beams and rafters, re-spraying lightly to correct uneven areas once dry.
- Use brushes for tight spots and touch-ups, ensuring a consistent finish and avoiding drips or uneven patches.
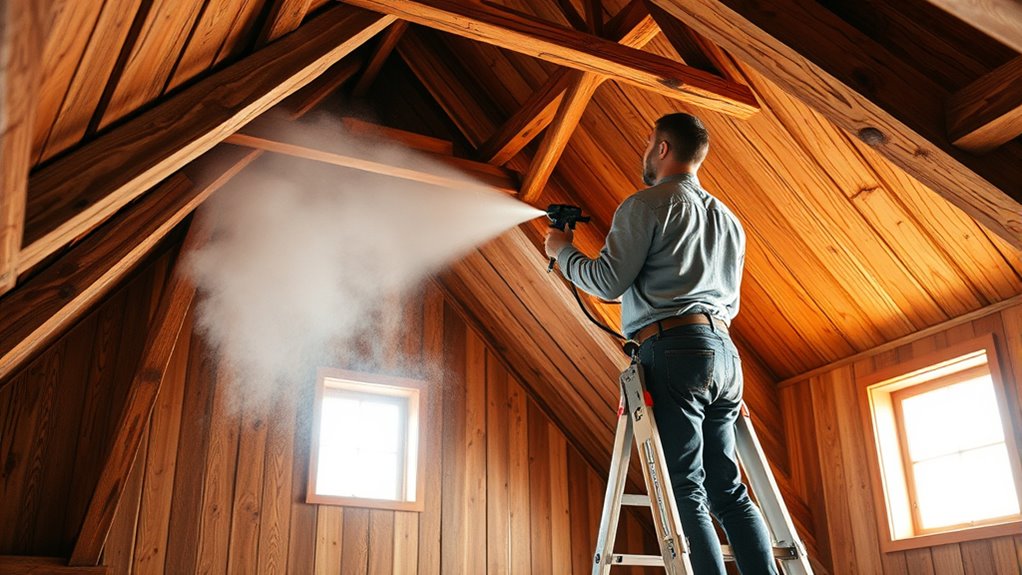
Spraying exposed beams and rafters is an efficient way to add color and protection, but it requires proper technique and preparation. Before you begin, it’s essential to choose the right spray equipment. For detailed woodwork like beams and rafters, a high-quality HVLP (High Volume Low Pressure) sprayer works best because it delivers a fine, even coat while minimizing overspray. Ensure the spray gun has adjustable settings for flow and pattern to give you control over the application. You want a spray tip size suited for wood—usually around 1.3 to 1.8 mm—to prevent drips and ensure smooth coverage. Test your equipment on scrap wood first to dial in the pressure and spray pattern, avoiding uneven patches or runs.
Once your equipment is ready, focus on your brush techniques for touch-ups and corners. While spraying provides a uniform finish on flat surfaces, you’ll need to switch to brushing for detailed areas, corners, and tight spots. Use high-quality brushes with synthetic bristles for water-based paints, or natural bristles for oil-based finishes. Apply paint or stain in long, smooth strokes, maintaining a wet edge to prevent lap marks. Keep a steady hand and work systematically, moving along the length of the beam or rafter, rather than jumping back and forth. This consistency helps achieve a seamless look.
Preparation is key to successful spraying. Cover surrounding areas with drop cloths and tape off any parts you don’t want painted. Make sure the wood surface is clean, dry, and free of dust or grease. Lightly sanding the wood beforehand can help the finish adhere better and smooth out rough patches. When you’re ready, hold the spray gun about 6 to 12 inches from the surface, maintaining a consistent distance to ensure even coverage. Use smooth, overlapping strokes—about half the spray pattern width—to avoid striping or streaks. Work in sections, and if you notice uneven coverage, go back and lightly spray over those areas once the initial coat dries.
Throughout the process, stay aware of your spray technique and adjust your speed as needed. Moving too quickly can cause thin spots, while going too slow might lead to drips or runs. Keep your hand steady and maintain a consistent pace. If you’re working on multiple beams or rafters, stay organized by completing one section fully before moving to the next. This approach minimizes overlaps and visible seams. With patience, proper equipment, and attention to detail, your finished beams will look professionally done—beautifully coated, vibrant, and protected for years to come.

VONFORN Paint Sprayer, 700W HVLP Spray Gun with Cleaning & Blowing Joints, 4 Nozzles and 3 Patterns, Easy to Clean, for Furniture, Cabinets, Fence, Walls, Door, Garden Chairs etc. VF803 Yellow
【4 Nozzles & 3 Spray Patterns】VONFORN 700W paint sprayer includes 4 nozzle sizes (1.0mm, 1.5mm, 2.0mm, 3.0mm) to…
As an affiliate, we earn on qualifying purchases.
As an affiliate, we earn on qualifying purchases.
Frequently Asked Questions
What Types of Paint or Stain Are Best for Beams and Rafters?
You should choose a high-quality, water-based stain or paint for beams and rafters. These finishes provide durability and a natural look, especially if you opt for a semi-transparent stain. Before applying, make certain proper surface cleaning to remove dust, grease, or old finishes. Proper surface preparation helps the finish adhere better and last longer. Selecting the right finish depends on whether you want a matte, satin, or glossy look, based on your style.
How Do I Prepare the Surface Before Spraying?
Did you know that proper surface prep can increase paint adhesion by up to 50%? To prepare your beams and rafters, start with thorough surface cleaning to remove dust, dirt, and grease. Then, lightly sand the wood to create a smooth, even surface that helps the spray adhere better. Wipe away any dust from sanding before you start spraying, ensuring a clean, well-prepped surface for the best results.
What Safety Precautions Should I Take During Spraying?
You should always wear protective gear like goggles, masks, and gloves to shield yourself from fumes and overspray. Make certain proper ventilation measures are in place by opening windows and using fans to disperse airborne particles. Keep a safe distance from the spray area, work in well-ventilated spaces, and avoid inhaling fumes. Taking these precautions helps protect your health and ensures a safer, more effective spraying process.
How Can I Prevent Drips and Uneven Coverage?
Did you know that improper spray technique can cause up to 30% waste? To prevent drips and guarantee coverage consistency, keep your spray gun at a steady distance—usually about 6-12 inches from the surface. Use smooth, even strokes, overlapping slightly with each pass, and avoid applying too much paint at once. Practice on scrap wood first to master your technique and achieve a flawless finish.
How Long Does the Finish Typically Last?
The finish on your beams and rafters typically lasts 5 to 10 years, depending on exposure and maintenance. To maximize finish durability, keep the area well-ventilated and avoid moisture buildup. Regular maintenance tips include cleaning with gentle soap and water, inspecting for chips or wear, and touching up areas as needed. Proper care helps preserve the finish’s appearance and protects your wood over time.

Kiven LED Spotlight with E26 Extension Socket, 7W Dimmable Accent Light, Adjustable Light Beam, Focus Spotlight for Paintings, Sculptures, Exposed Light, Recessed Can Light Conversion(20"
【Specification】Size: 1.9" in dia. Bulb base: E26 (Bulb Included). Wattage: 7Watts. LED lights driver with stable quality, more…
As an affiliate, we earn on qualifying purchases.
As an affiliate, we earn on qualifying purchases.
Conclusion
Spraying exposed beams and rafters can transform your space with a fresh, uniform finish. Remember, over 70% of homeowners who update their woodwork report increased satisfaction and home value. So, take your time, follow the steps carefully, and enjoy the stunning results. With patience and the right techniques, you’ll achieve a professional look that lasts. Don’t rush—your beautifully sprayed beams will be worth the effort!
VONFORN Paint Sprayer, 700W HVLP Spray Gun with Cleaning & Blowing Joints, 4 Nozzles and 3 Patterns, Easy to Clean, for Furniture, Cabinets, Fence, Walls, Door, Garden Chairs etc. VF803 Yellow
【4 Nozzles & 3 Spray Patterns】VONFORN 700W paint sprayer includes 4 nozzle sizes (1.0mm, 1.5mm, 2.0mm, 3.0mm) to…
As an affiliate, we earn on qualifying purchases.
As an affiliate, we earn on qualifying purchases.

Set of 2 2 Inch Flat Paint Brushes – High European Quality – Natural Bristles – for Home, Wood, Walls, Art, Trim & Furniture – for Acrylic, Oil, Stain, Chalk & Latex Paints
PRODUCT SET: Includes two high quality 2-inch flat paint brushes, perfect for detailed work.
As an affiliate, we earn on qualifying purchases.
As an affiliate, we earn on qualifying purchases.

Franz came aboard the Paint Sprayer Zone team with a background in both journalism and home renovation. His articulate writing style, combined with a passion for DIY projects, makes him an invaluable asset. Franz has a knack for breaking down technical jargon into easy-to-understand content, ensuring that even the most novice of readers can grasp the complexities of paint sprayers.